
Set up multiple environments for Python project - better late than never
| Access | Public |
|---|---|
| Categories | Blogs |
| Created | |
| Date | |
| Last update | |
| Reading Time | 10 mins |
| Status | Complete |
| Tags | PythonTutorial |
Table of Content
Why multiple environments
You may enter the world of coding as being amazed by the easy-to-read syntax of Python and rich libraries/resources in the community. At some point, you start to get frustrated with the endless errors while installing python libraries or running old scripts. Trust me - it is absolutely normal - almost every beginner to Python has gone through this struggle. Python, as a high-level programming language, is extremely friendly for beginners with no coding background to get hands-on experience despite skipping learning basic but dry concepts or practices. However, these basics are essential to enter the next level of Python programming and develop complex, robust, replicable, and professional. In this article, I will recap dry but vital concepts of Python programming and walk you through the setup of multiple environments using conda.
Dry but essential concepts
Virtual environment
A virtual environment is a Python environment such that the Python interpreter, libraries and scripts installed into it are isolated from those installed in other virtual environments, and (by default) any libraries installed in a “system” Python, i.e., one which is installed as part of your operating system. 🔗
Conda and pip
Conda and pip are both commonly-used package managers. Check this website for the comparison between conda and pip. Overall, aside from managing packages, conda can be used to manage virtual environment. Pip and conda can be used interchangeably in a Conda environment. For more information, please go through the rest of this article.
Anaconda VS miniconda VS conda
The following diagrams should explain the difference between anaconda, minconda, and conda clearly.


PyPI
Python Package Index (PyPI) is a repository of software for python programming language. PyPI helps you find and install software developed and shared by the Python community. Pip looks for packages in PyPI.
Set up multiple virtual environments
This instruction is designed for people with different programming preferences and knowlegde. You can use either one of GUIs or tools among command prompt, Anaconda, or Pycharm to set up and manage virtual environments for python projects.

Using conda and command prompt
1. Download and install mini conda or anaconda
Check out tupui’s answer to the difference between mini Conda and anaconda.
2. Create an environment with commands
To create an environment in the default folder using conda, run:
conda create --name <ENVIRONMENT-NAME> python==3.9To create an environment in a user-defined folder, run:
conda create --prefix <SELF-DEFINED-ENVIRONMENT-PATH> python==3.9Notes:
As you may notice, —name → environments live in the default folder; —prefix → environments live in user-defined folders. This applies to most command lines for environment management using conda.
It is recommended to create an environment for a specific python project in a subdirectory of the project directory, which makes the project more self-contained and the IDE (such as PyCharm) easily tell which environment to use. However, if not using the default directory, you’ll need to pass the —prefix flag along with the environment’s full path to locate and manipulate the environment.
2. (Alternative) Create a virtual environment from a yaml file
- Create a YAML file with information of name of environment, version of python, etc..
name: NAME—OF-ENVIRONMENT

channels:
	- default
	- conda-forge

dependencies:
	- python=3.9
	- pip=20.3.3
	- (OPTIONAL) OTHER PACKAGES/LIBRARIES
	- pip:
- (OPTIONAL) OTHER PACKAGES/LIBRARIES only exists on pip- Create a virtual environment from the yaml file by running the following line in terminal or command prompt:
conda env create -f <YAML-FILE-NAME>.yml3. Activate an environment
# For an environment saved in the default folder
conda activate <NAME-OF-ENVIRONMENT>

# For an environment saved in a user-defined folder
conda activate <USER-DEFINED-ENVIRONMENT-PATH>
4. Install dependencies in a specific environment 🔗
conda install <PACKAGE-NAME>=<VERSION>You can also use pip in the environment managed by conda.
pip install <PACKAGE-NAME>=<VERSION> --upgrade-strategy only-if-neededNote: Use pip only if conda is not working for specific packages and don’t use pip with the —under argument, avoid al users installs.
5. Export environment configurations as a YAML file
# Activate environment
# For the ones saved in the default folder
conda activate <ENVIRONMENT-NAME>
# OR the ones saved in a user-defined folder
conda activate <USER-DEFINED-ENVIRONMENT-PATH>

# Export as a YAML file
conda env export > environment.yml
6. Cheatsheet of environment management in conda 🔗
- List all environments. Note this
conda env list- Clone an environment
conda create --name <NAME-OF-ENVIRONMENT> --clone <NEW-NAME>- Update an environment from a yaml file
conda env update --prefix <YAML-FILE-FOLDER> --file <YMAL-FILE-NAME>.yml --pruneNote: The --prune option causes conda to remove any dependencies that are no longer required from the environment.
- Deactivate an environment
# For an environment in the default folder
conda deactivate <NAME-OF-ENVIRONMENT>

# For an environment saved in a user-defined folder
conda deactivate <USER-DEFINED-ENVIRONMENT-PATH>- Remove an environment
# For an environment in the default folder
conda remove --name <NAME-OF-ENVIRONMENT> --all

# For an environment saved in a user-defined folder
conda remove --prefix <USER-DEFINED-ENVIRONMENT-PATH> --all
Set up environment in PyCharm
Let’s say you want to set a virtual environment for one of your python projects. Please open your python project in PyCharm and go through the following steps.
Aside from creating a virtual environment using conda and command prompt, you can also create and manage virtual environment in PyCharm through the following steps.
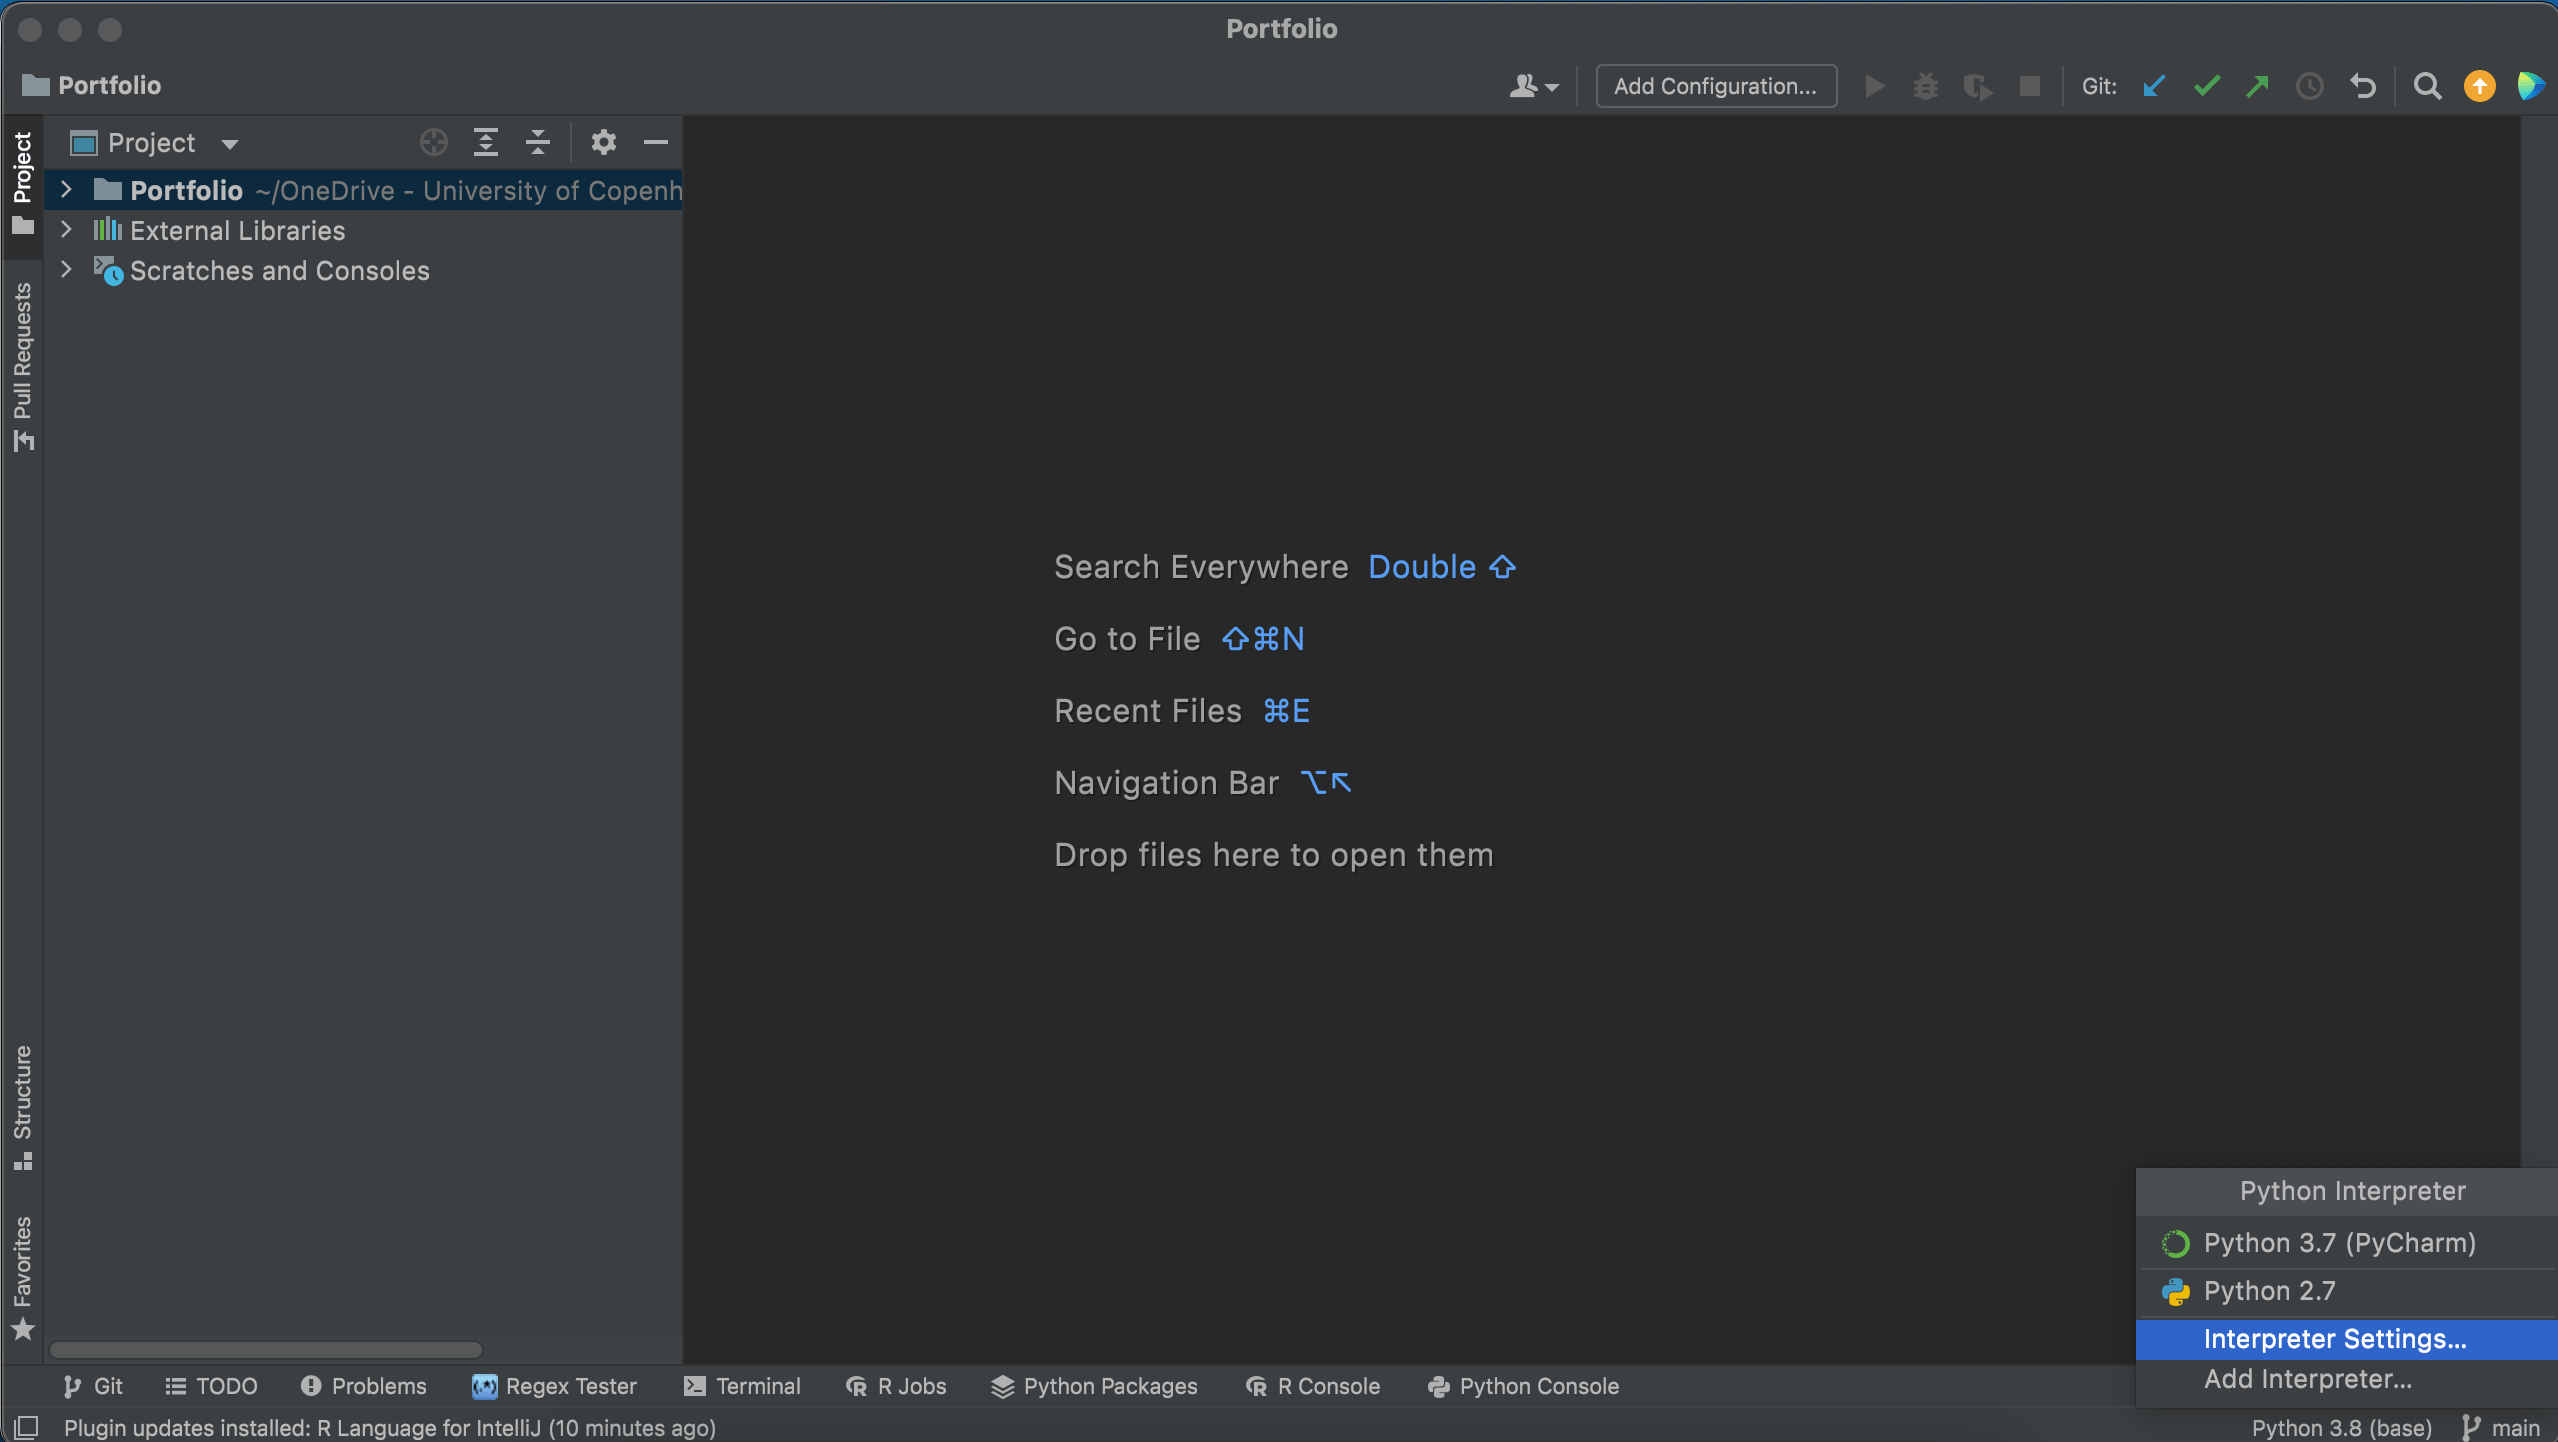
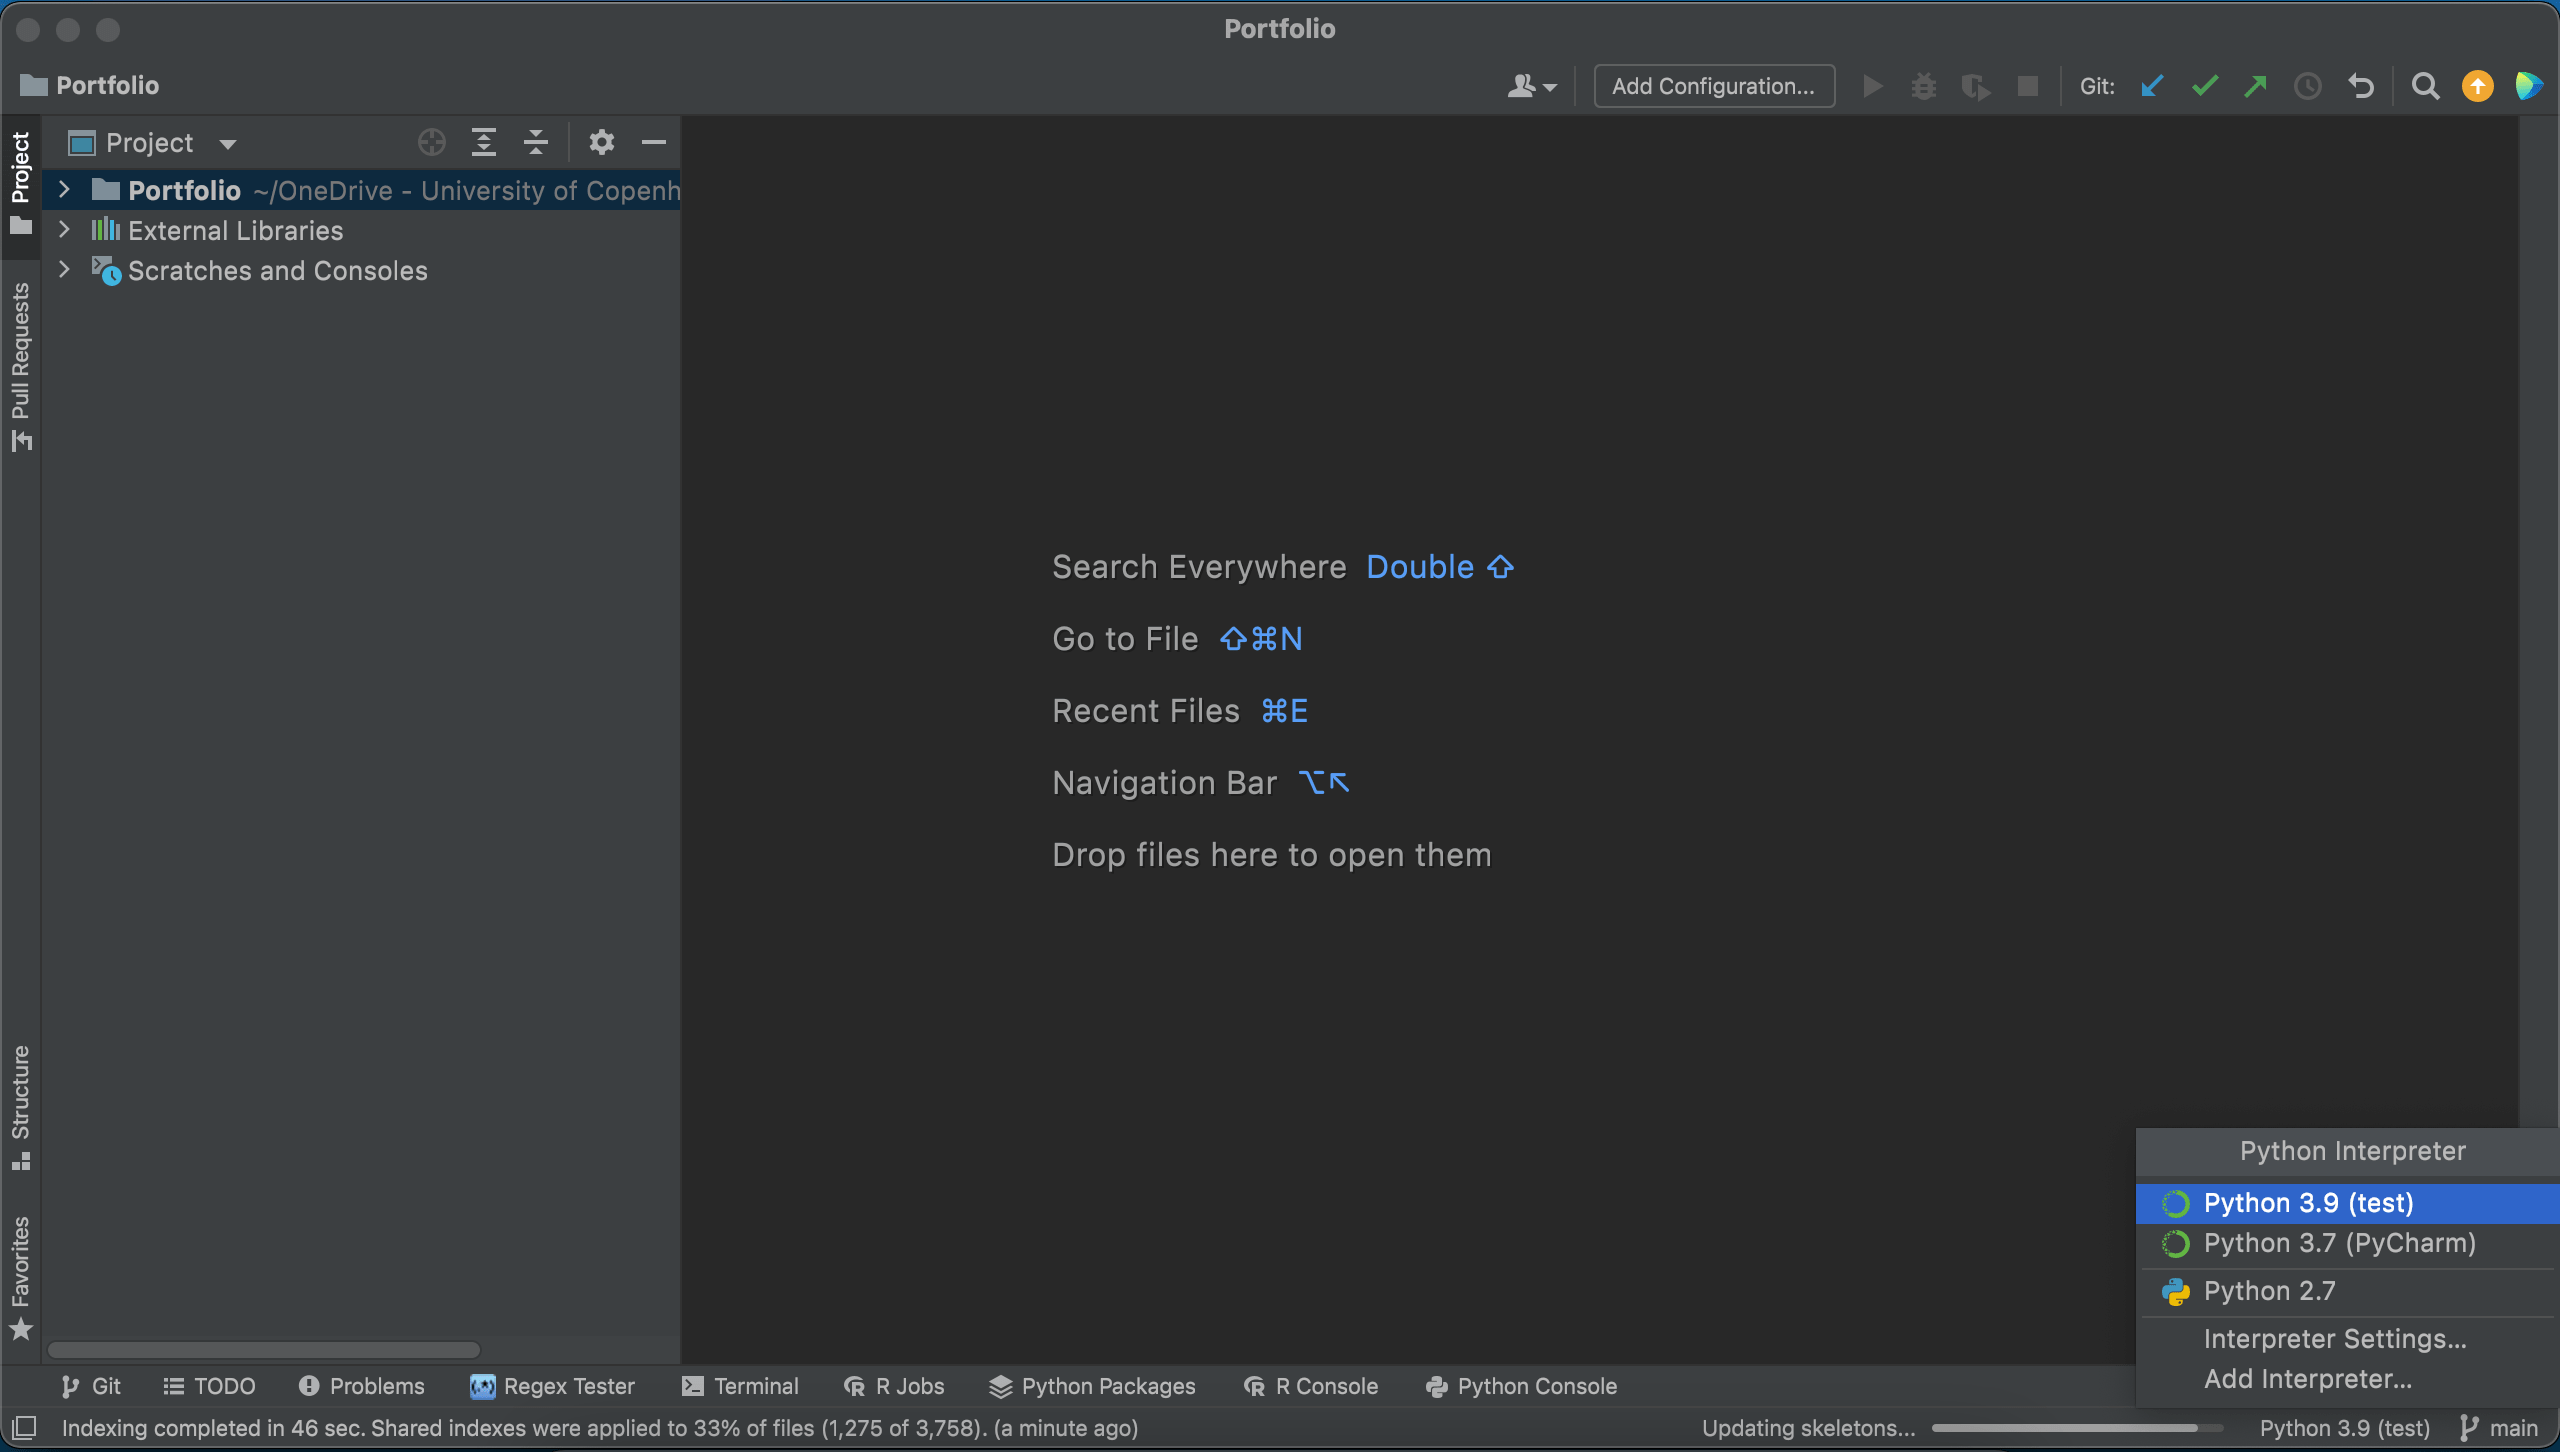
- Click the bottom right to open a list of python interpretersuser and click
Interpreter Settings
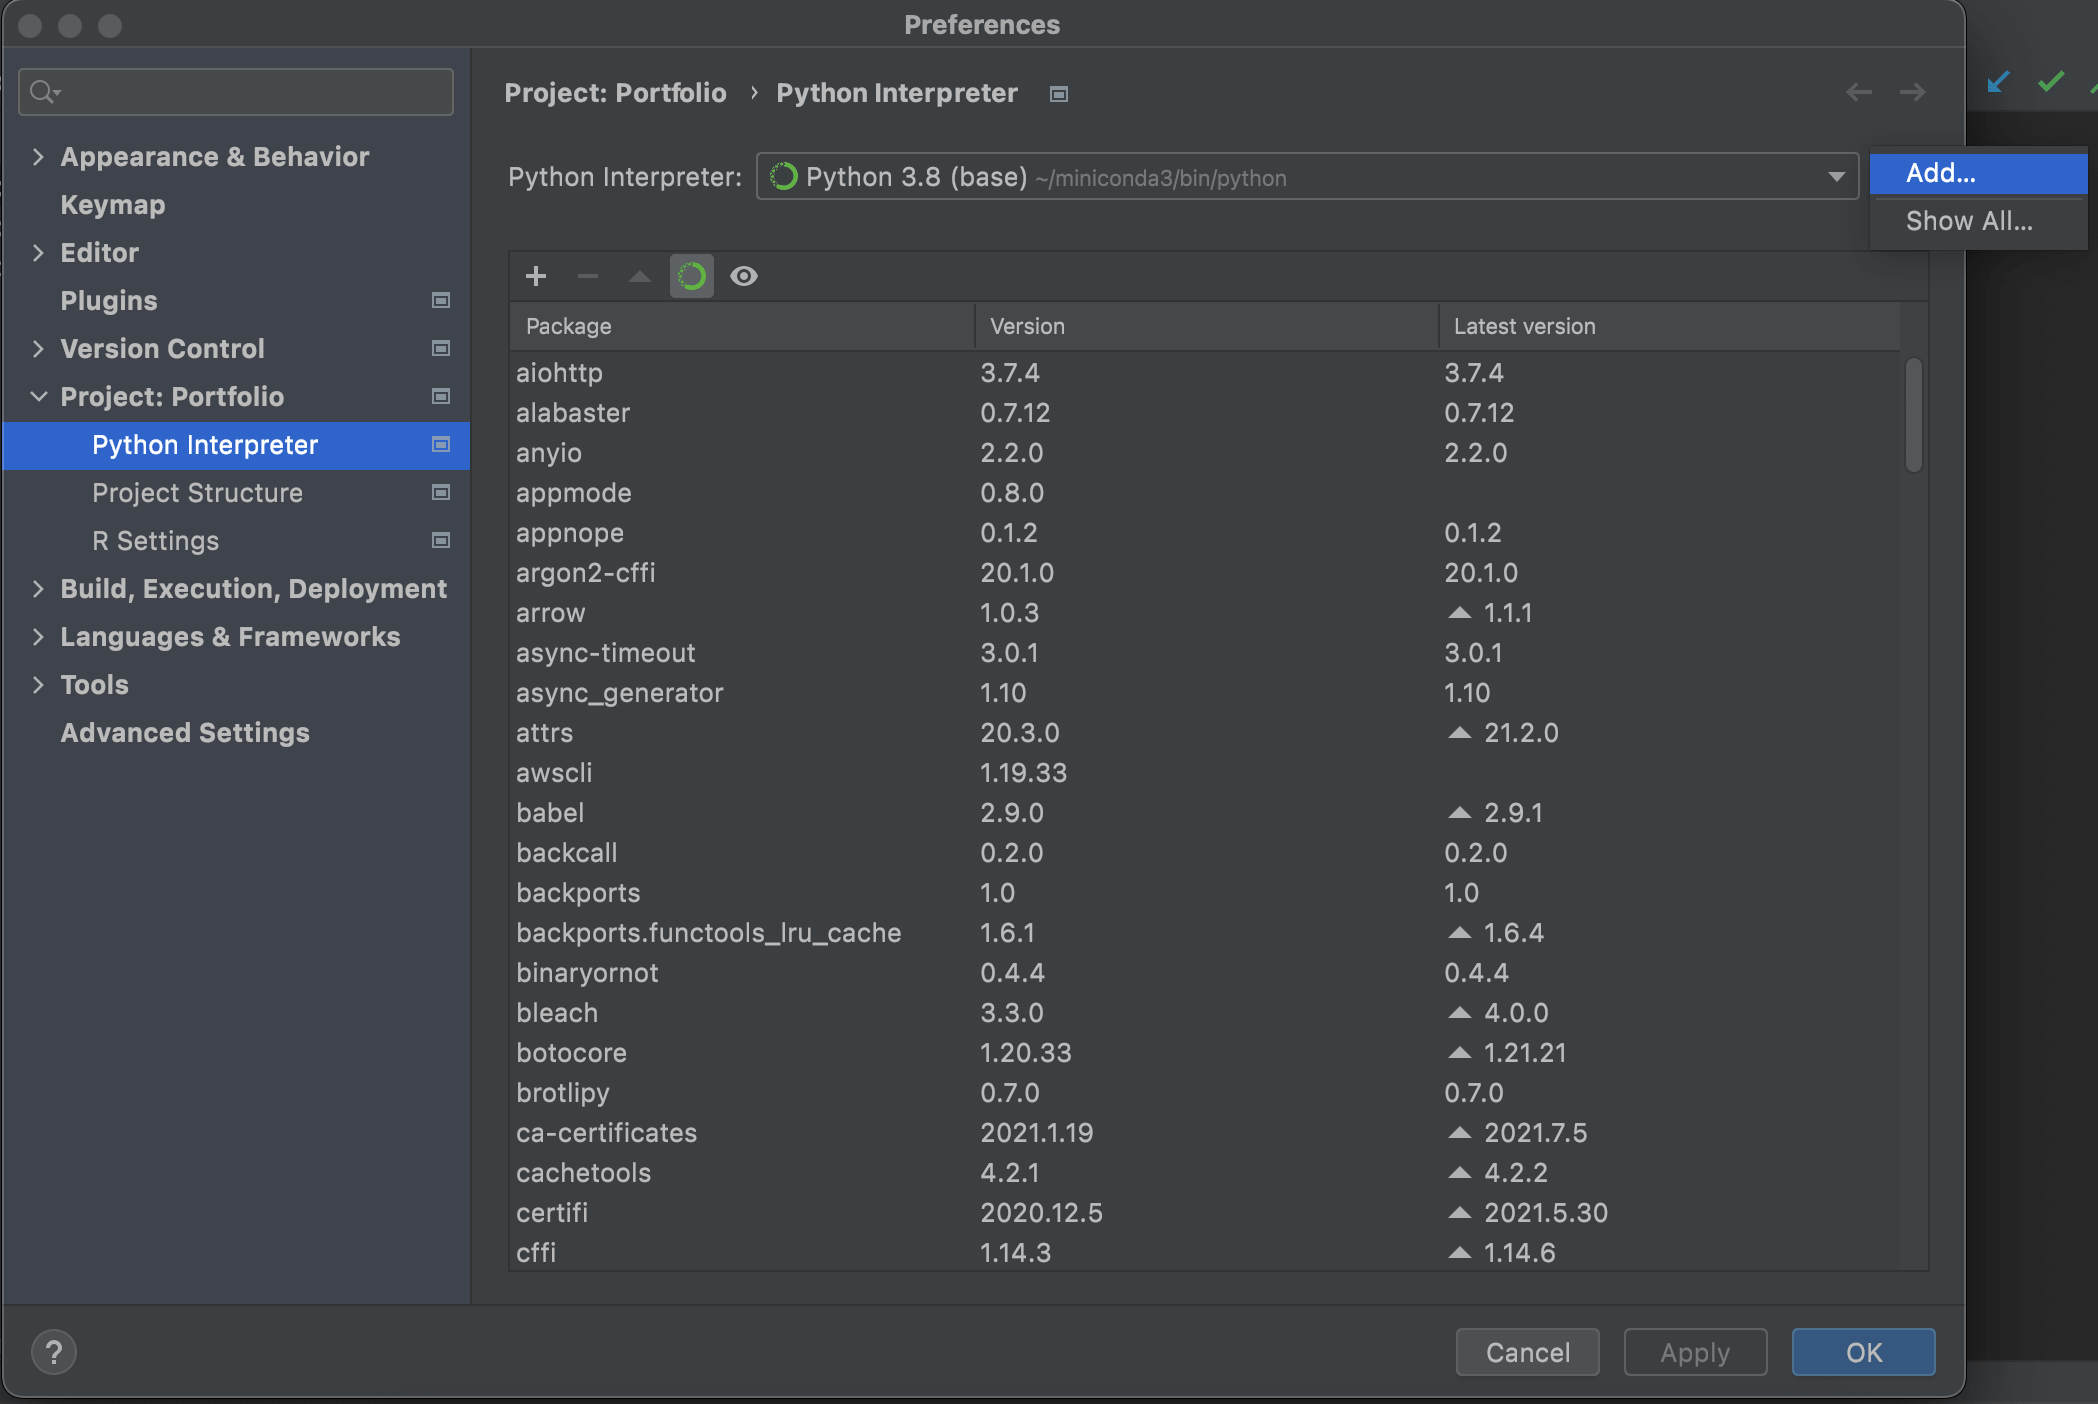
- Click the gear icon on the upper right corner and click
Add…
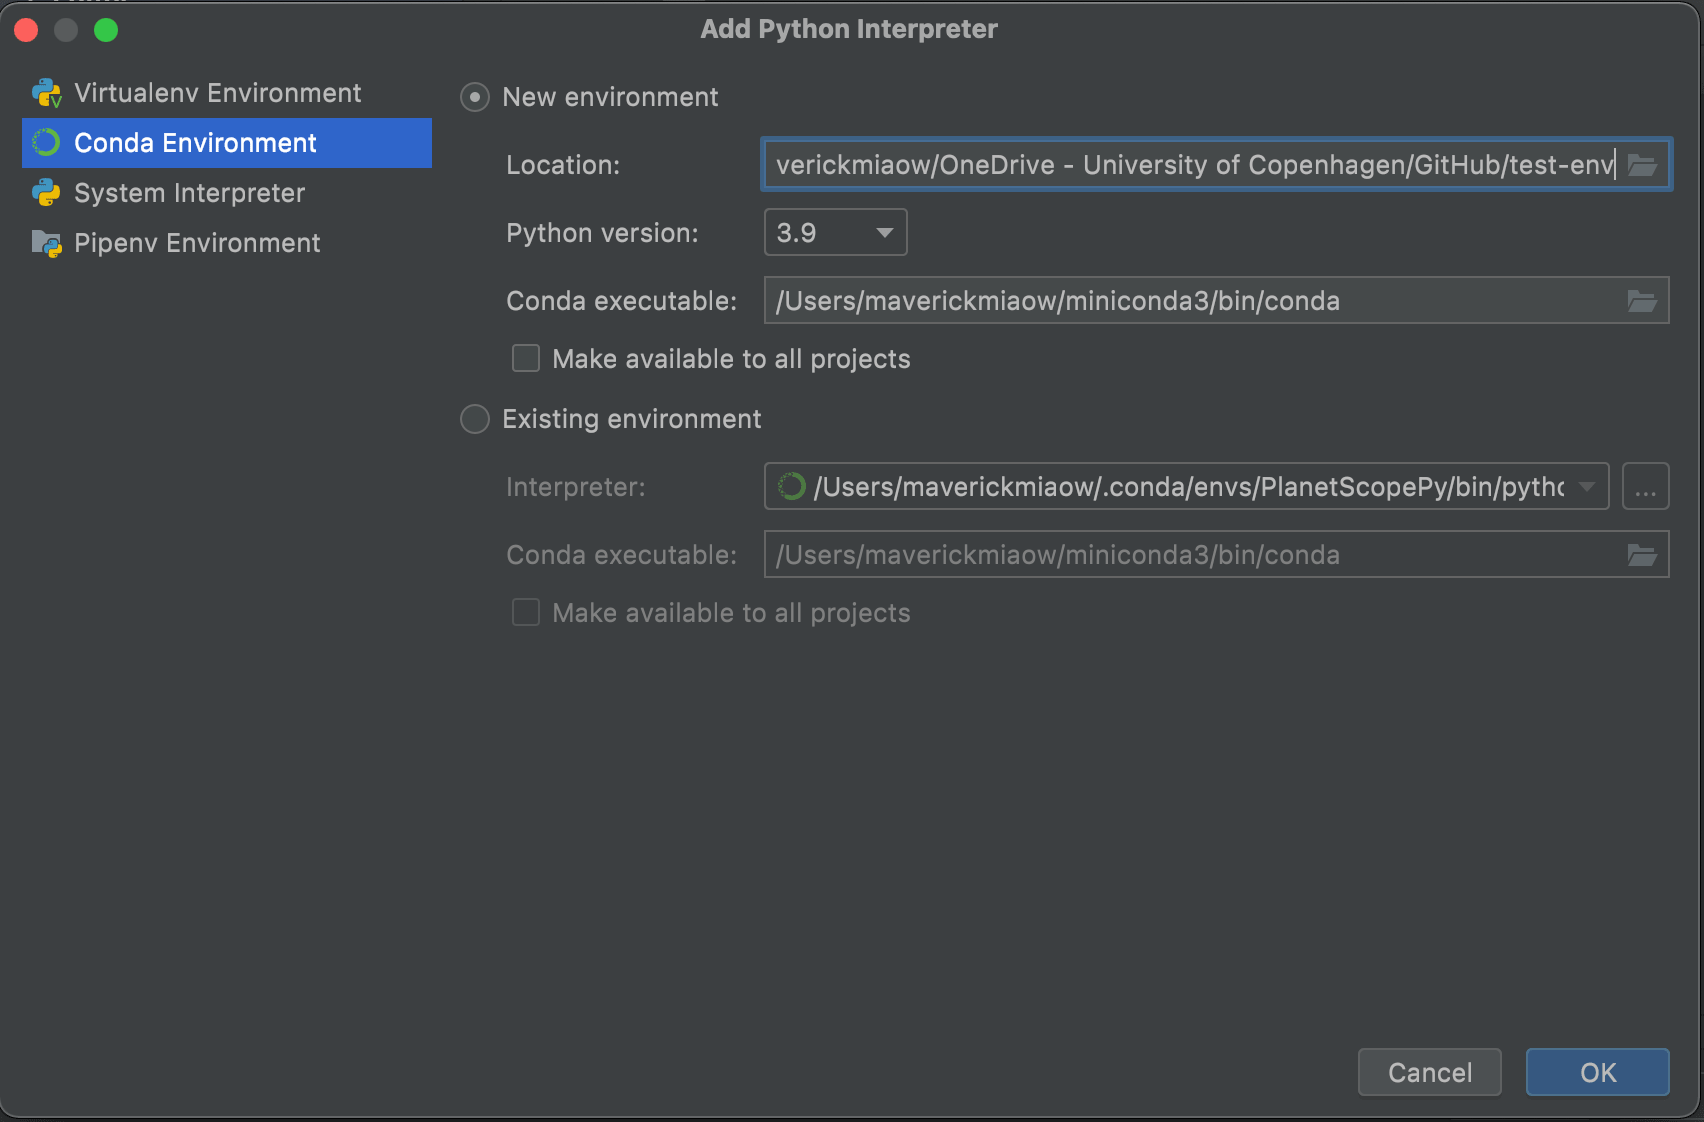
- Go to
Conda Environment→ ChoseNew environment→ Specify the environment folder path and the folder name. A new folder will be created under the project root folder. → Select the python version → Select the Conda excitable if you have multiple conda installed. → ClickOK
- Click
Show Allto see all the python environment. You can modify the name of environment in the new window. At the same time, you can see some basic packages are already installed in the new environment.
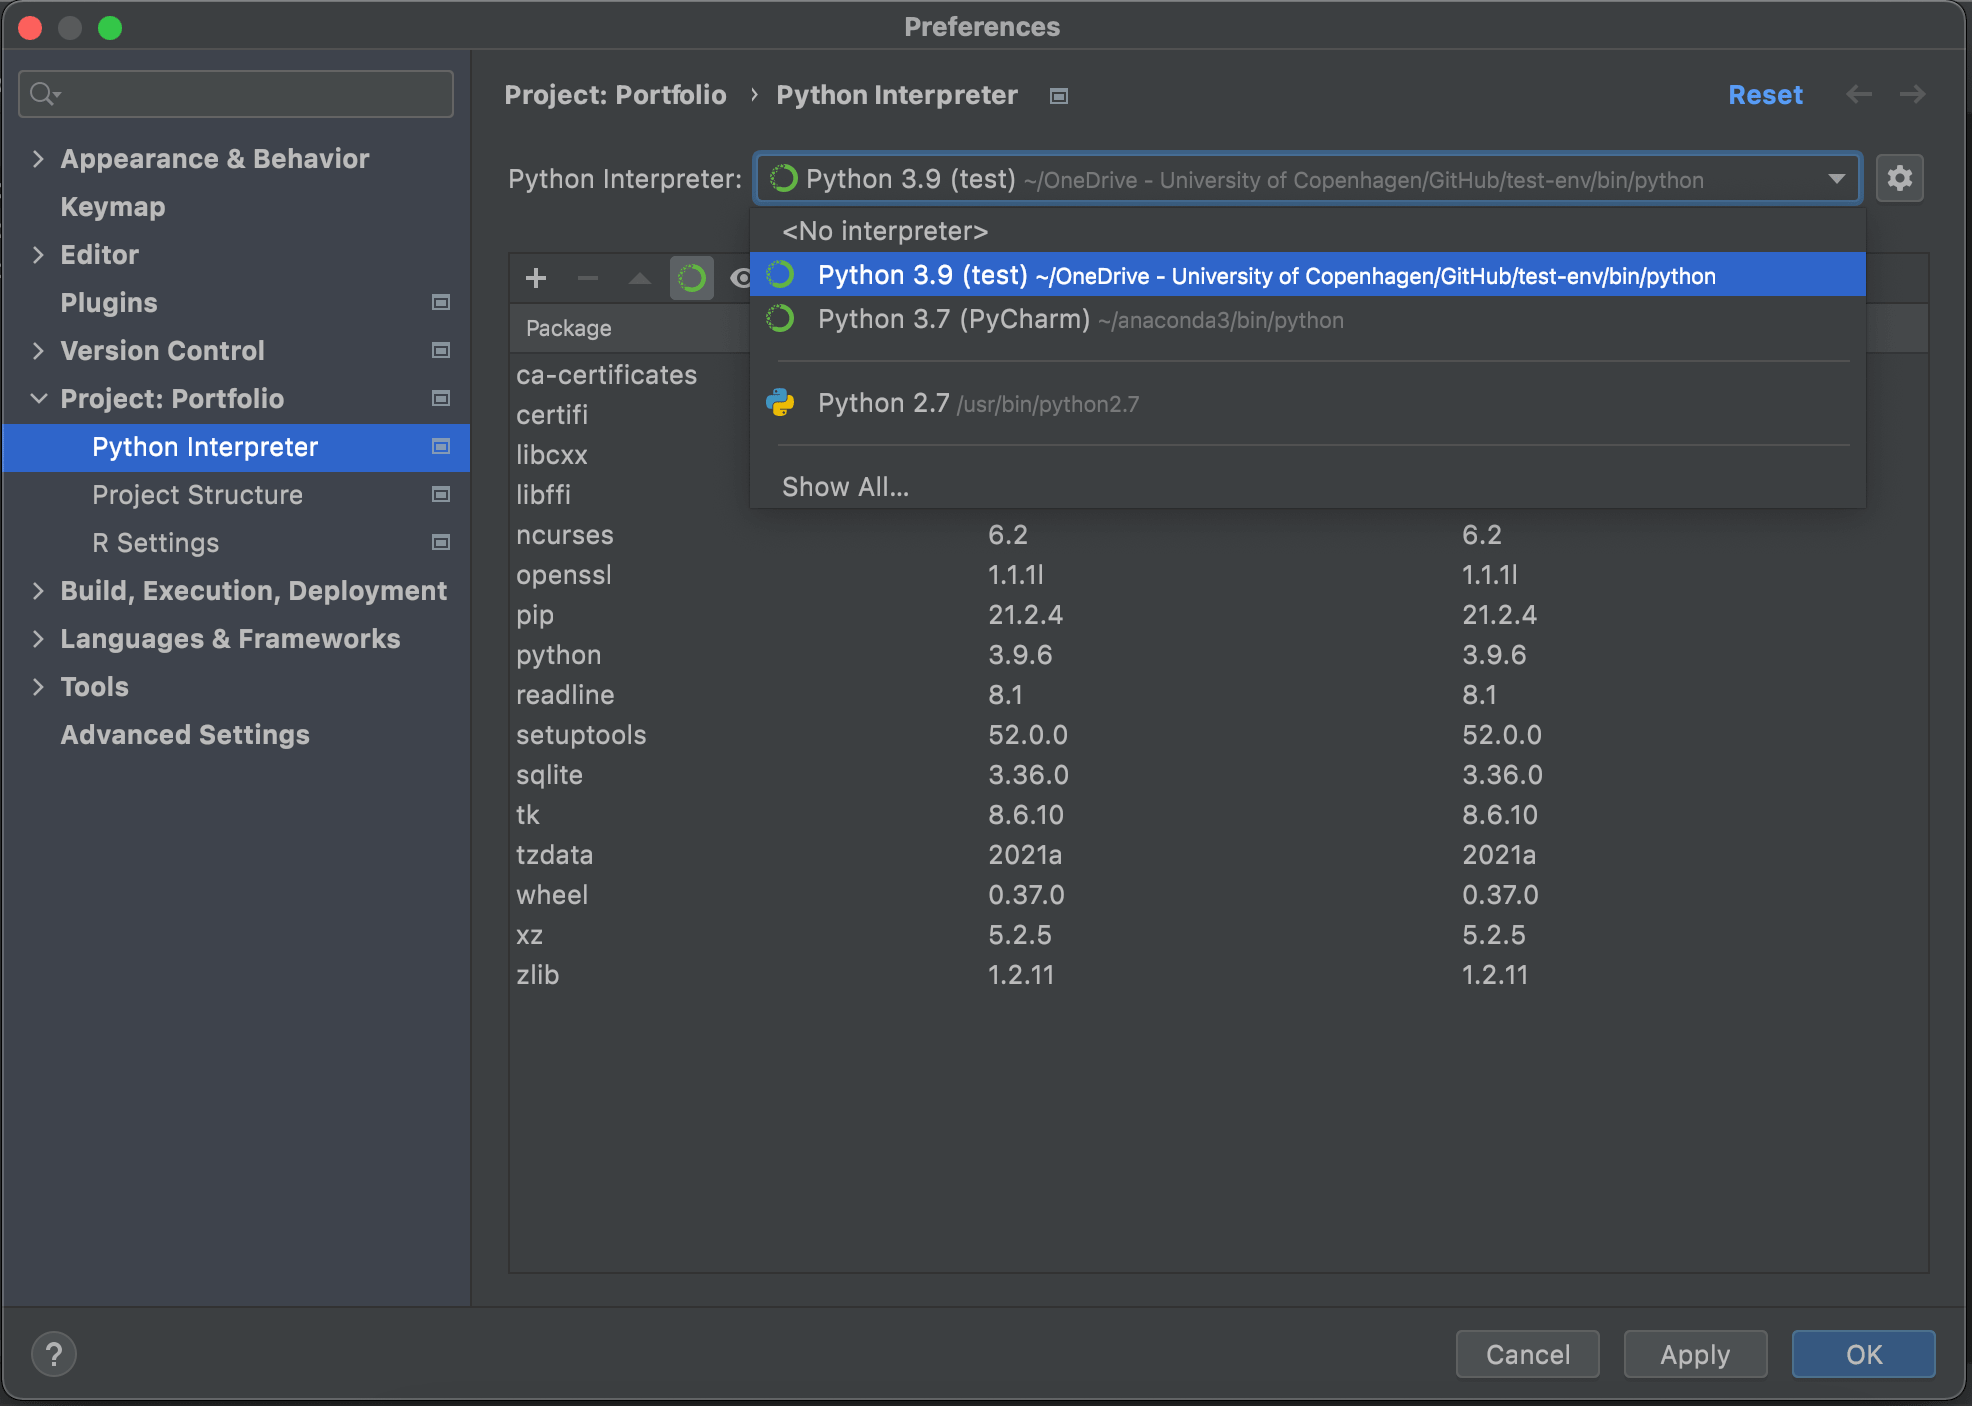

Go back to the main interface, and you should see the new environment you just created.
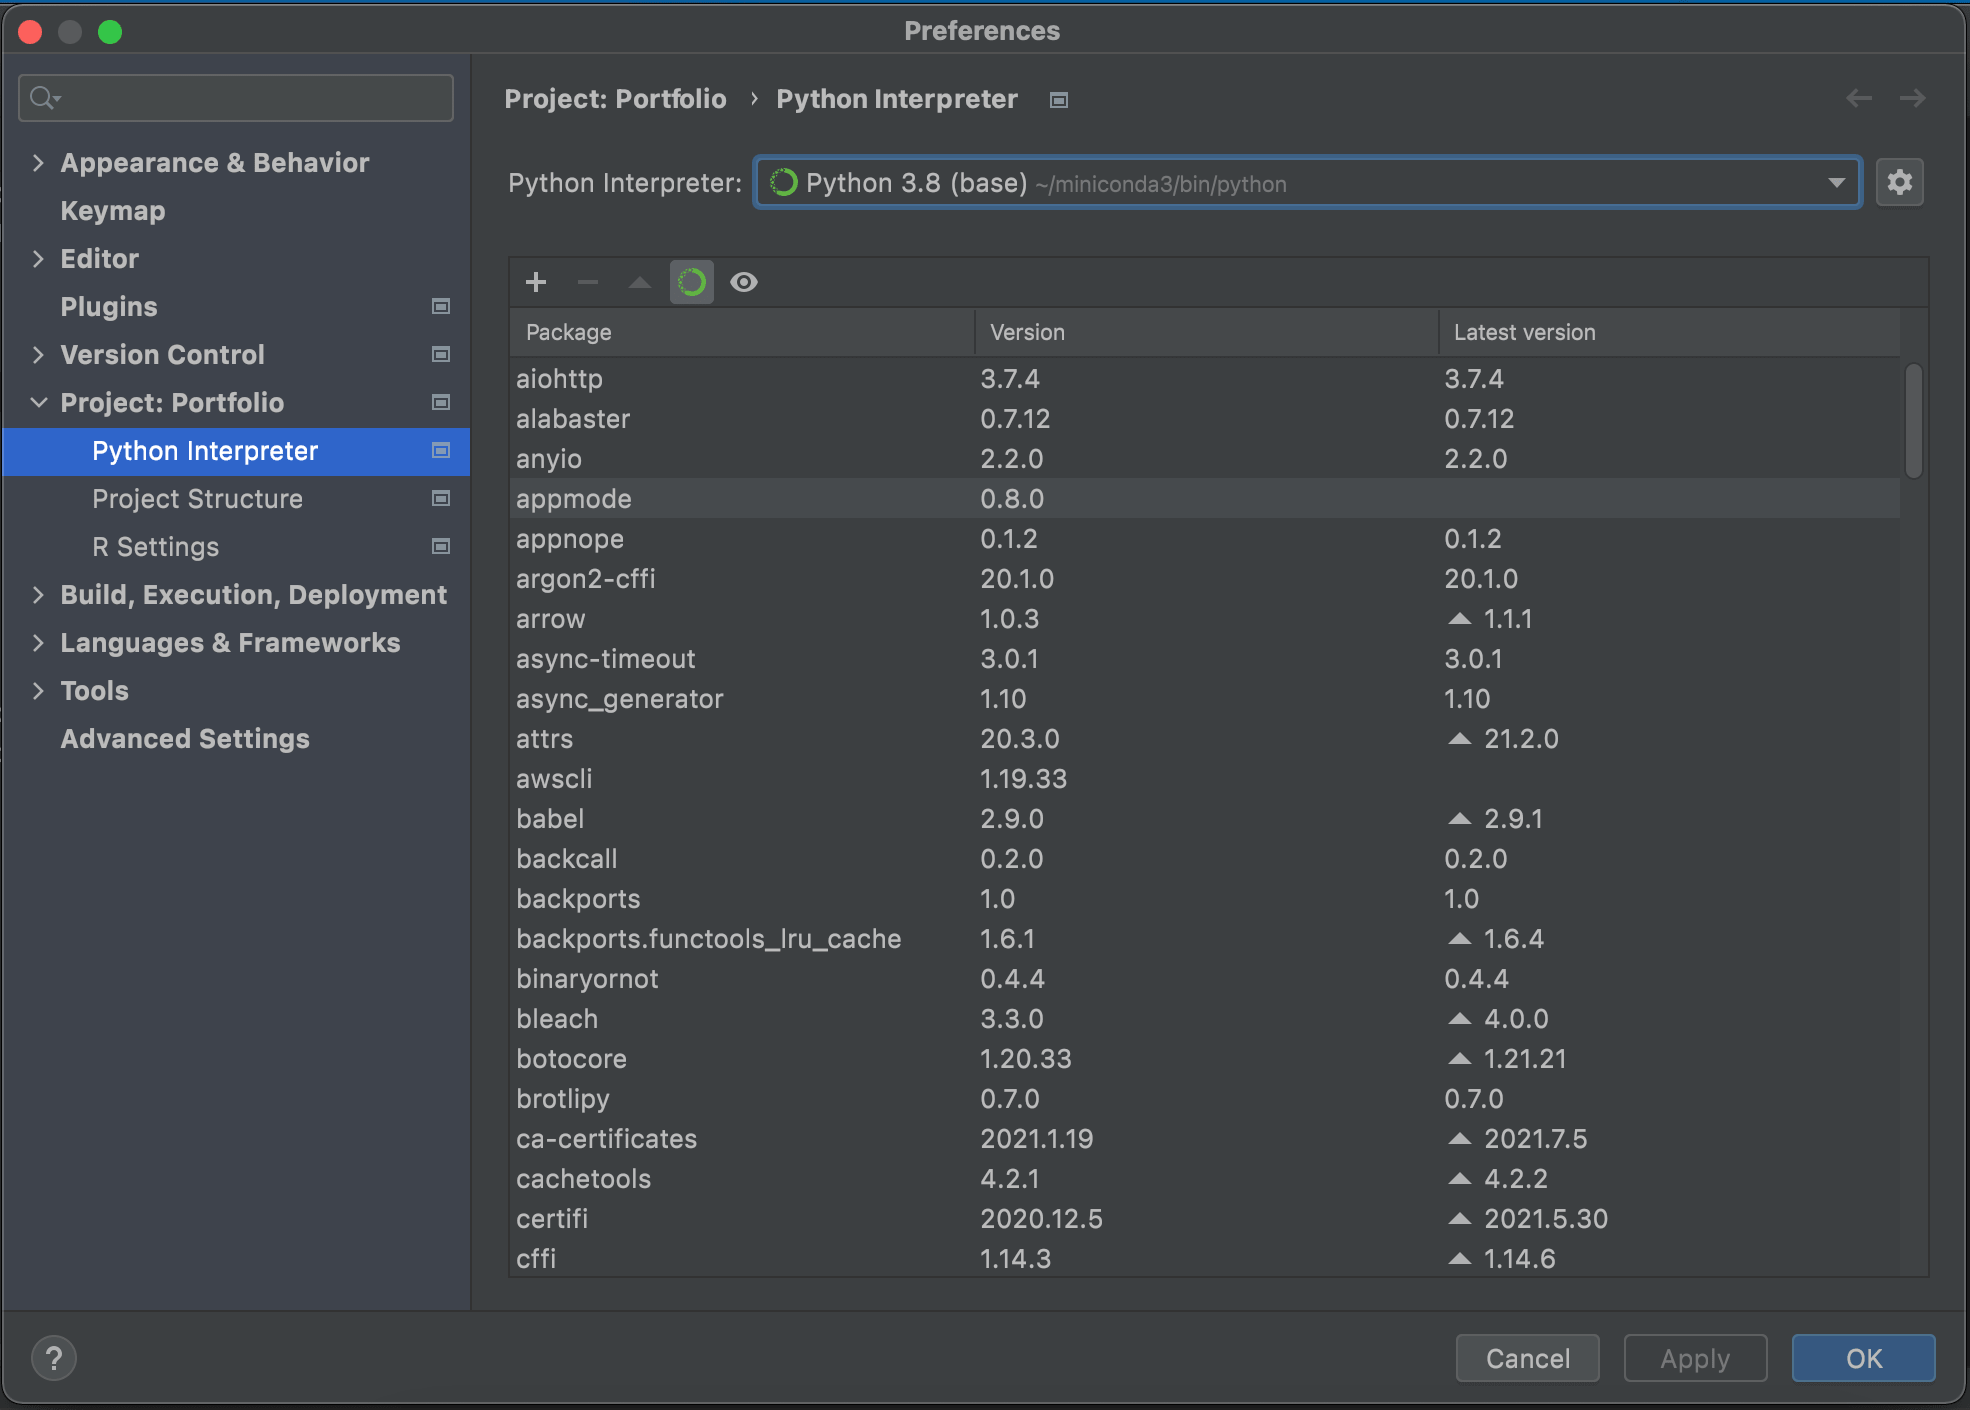
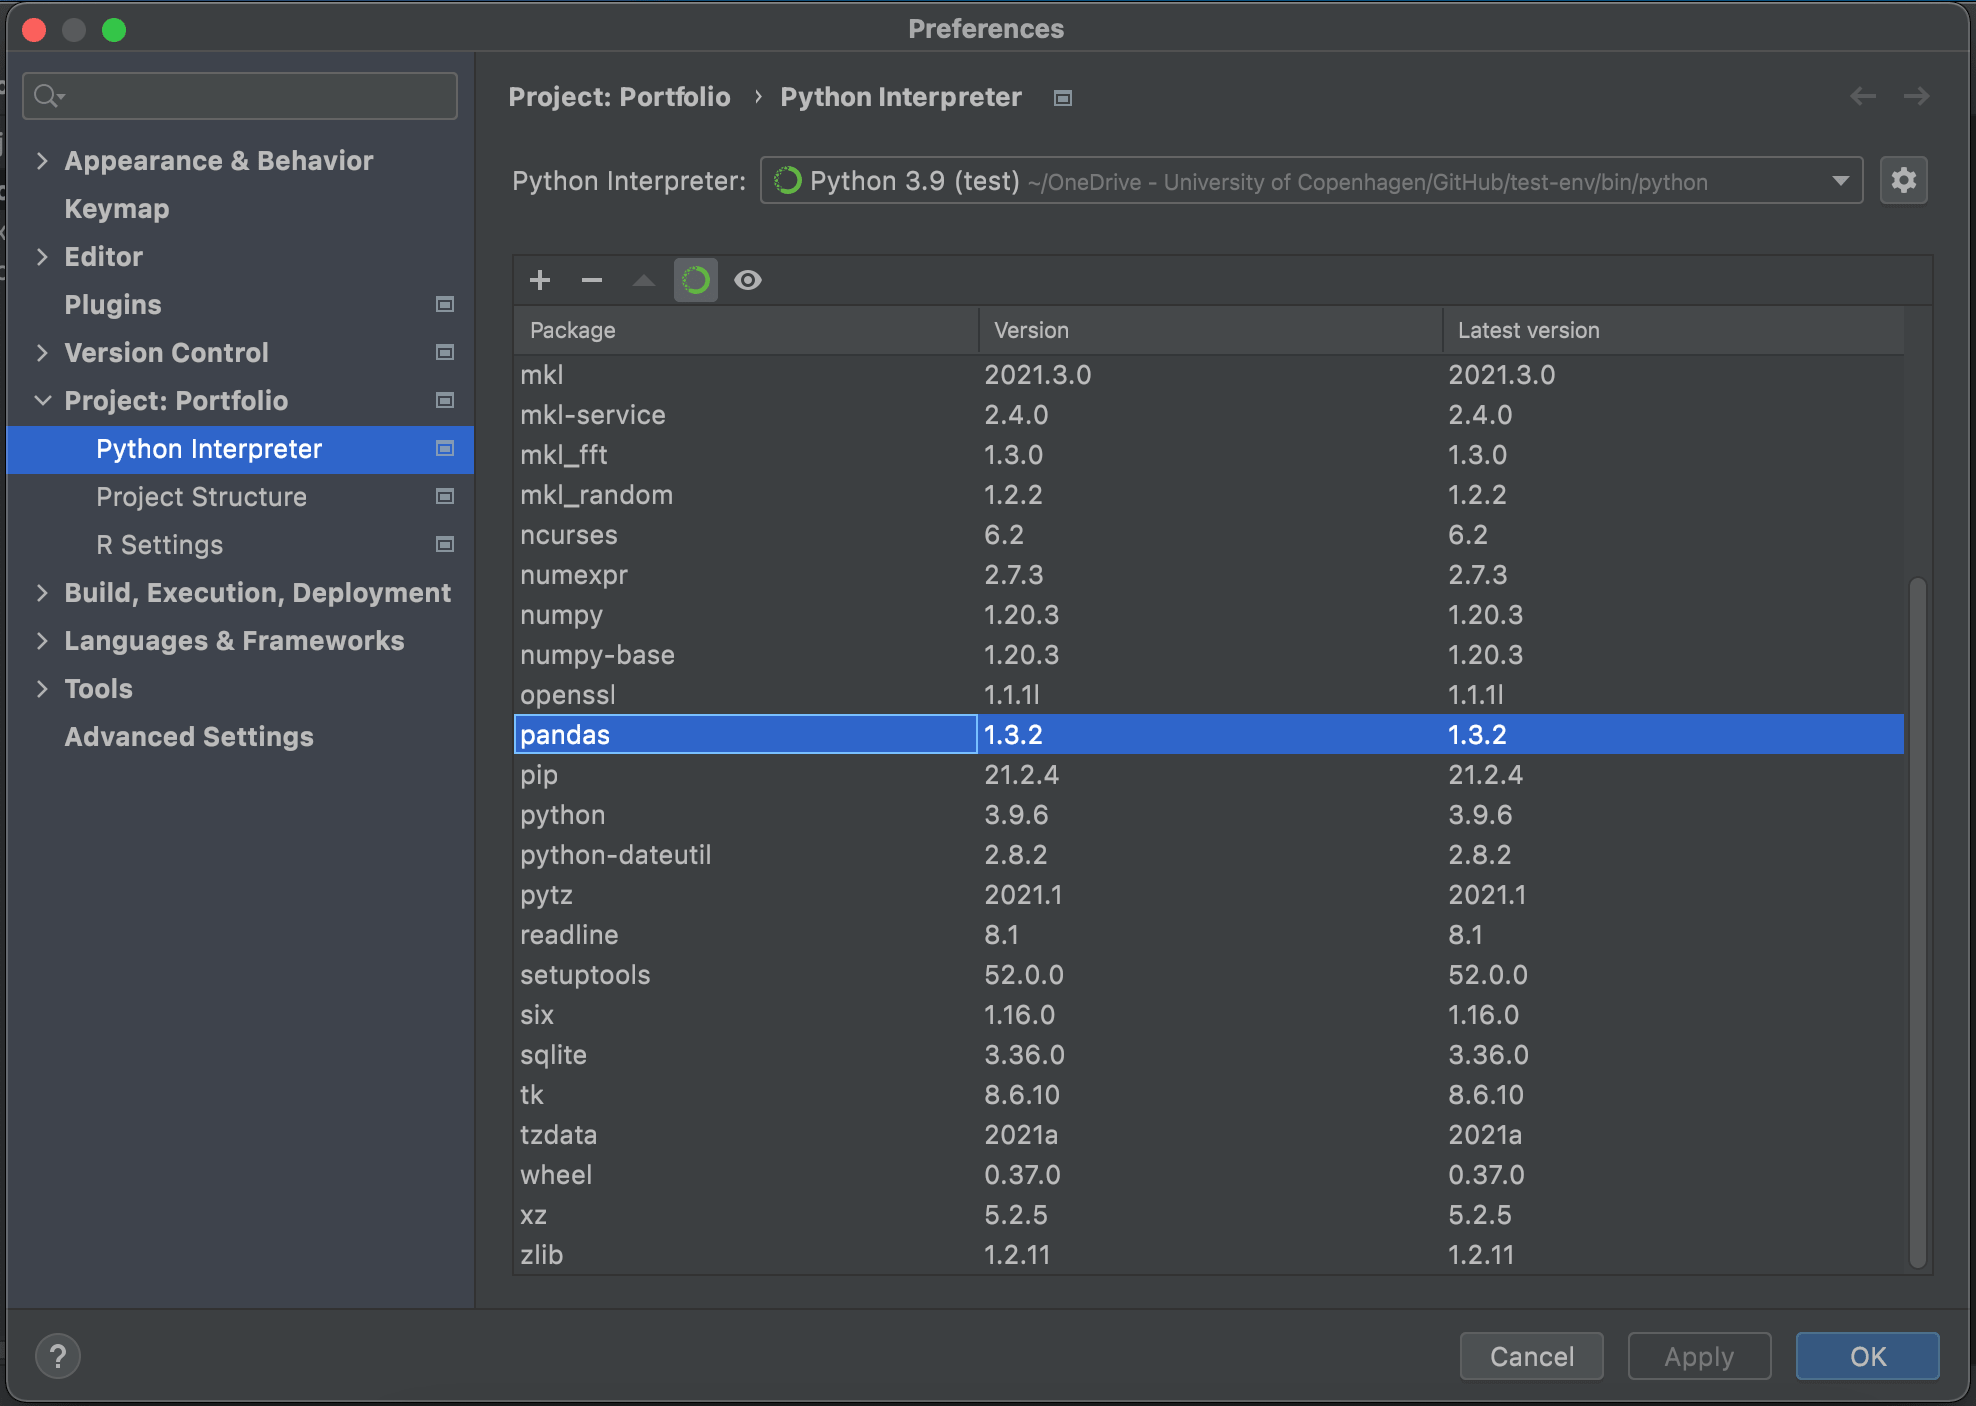
- Manage libraries in PyCharm - To manage libraries in the virtual environment, go to
Python Interpreter Setting. Click+
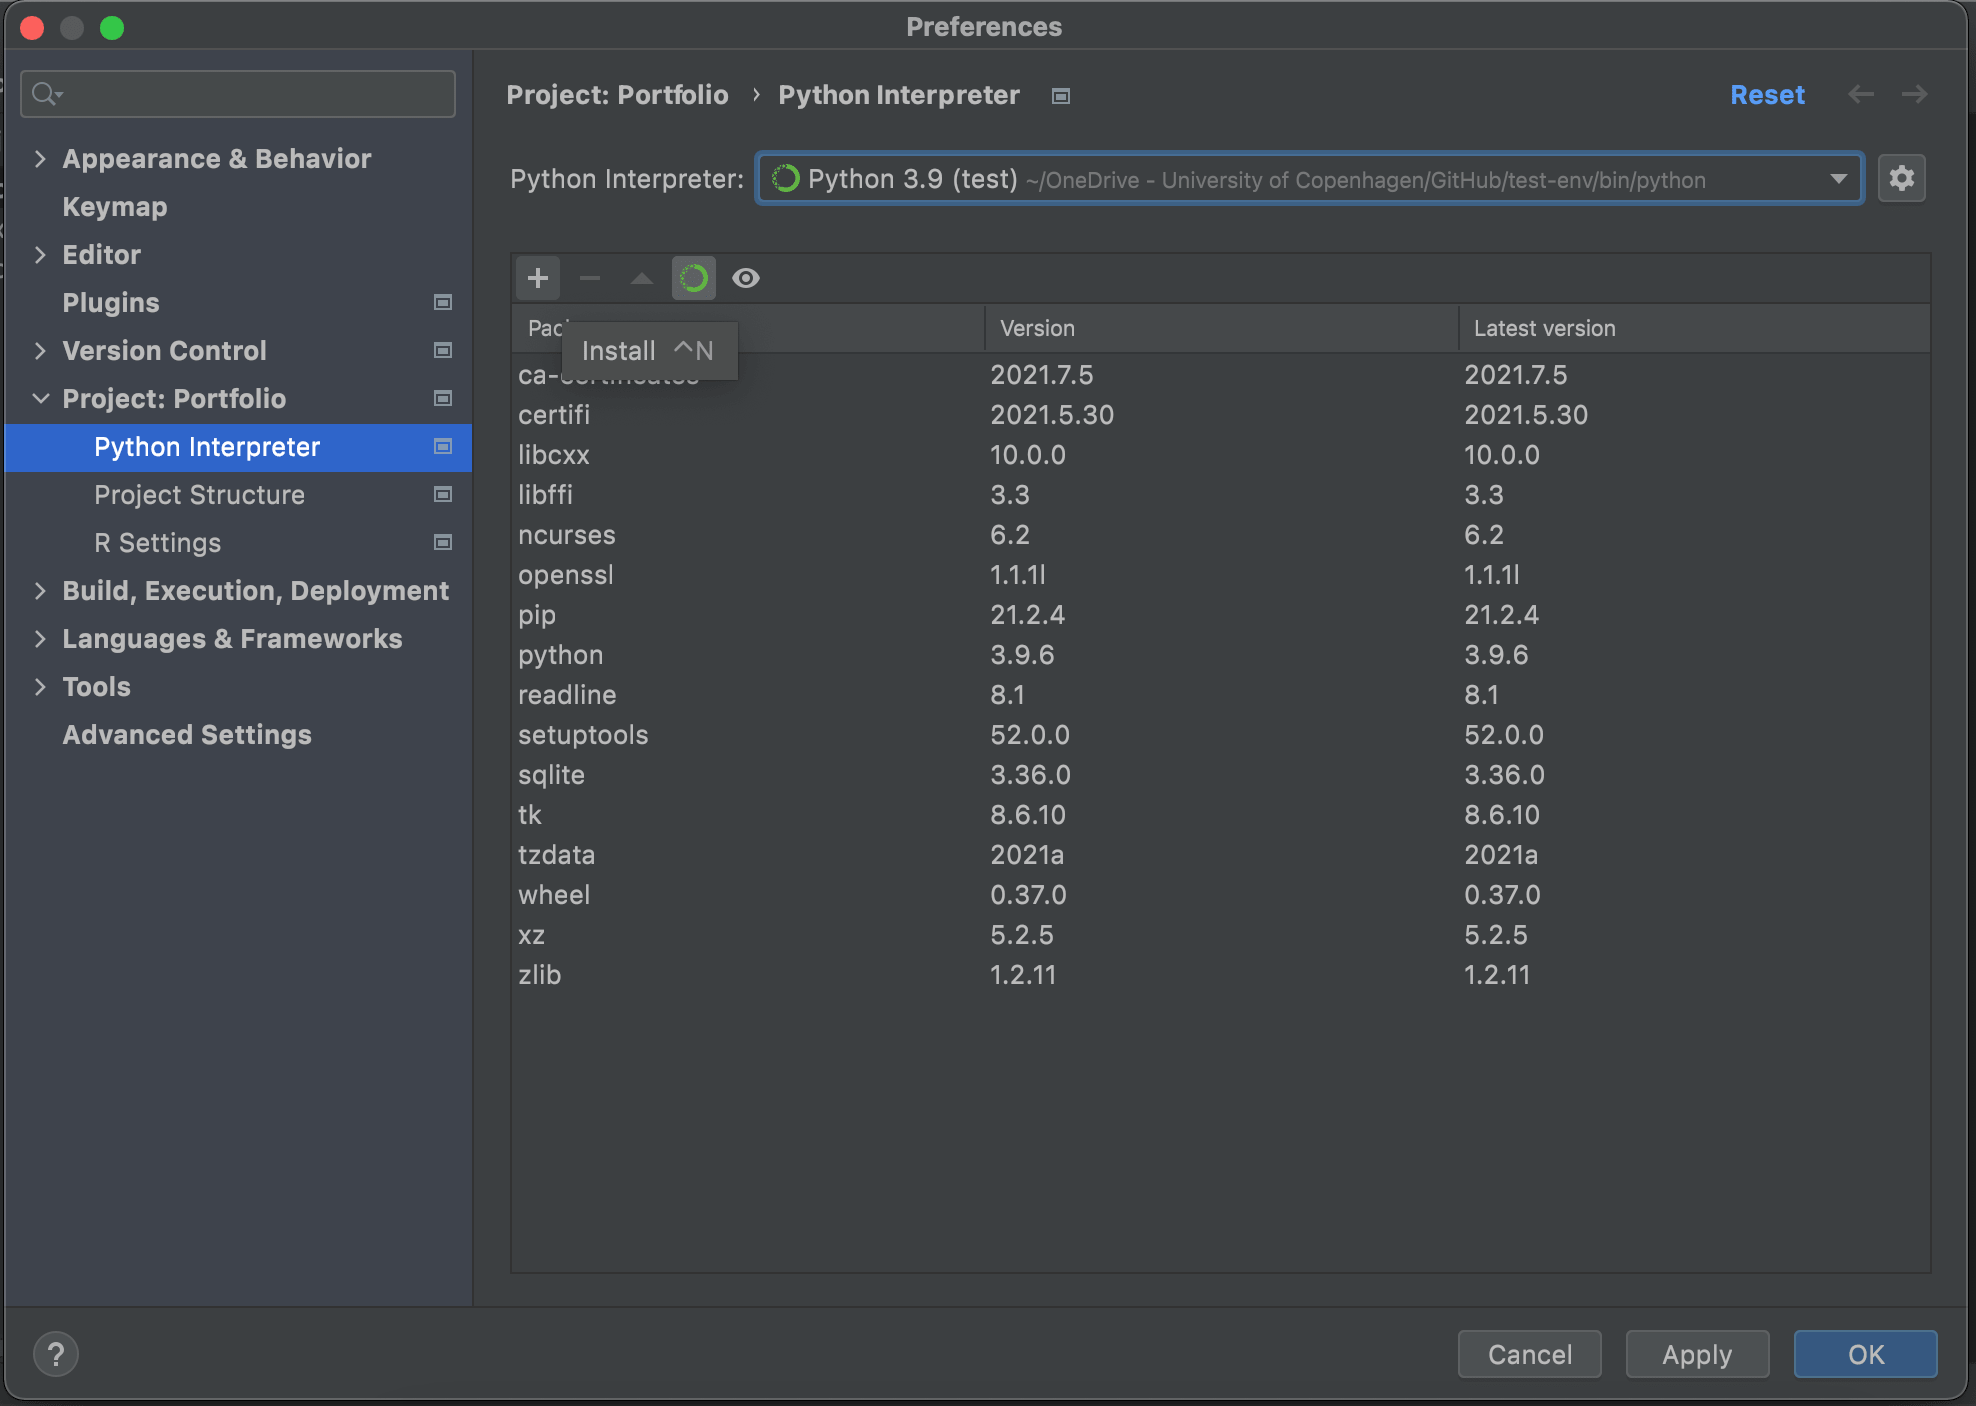
In the new window, search for package → Select the package → Specify version on the right panel. You can skip this step to install the latest version → Click Install Package
Note: if you cannot find the packages, please go to Terminal in PyCharm and install the package through pip.
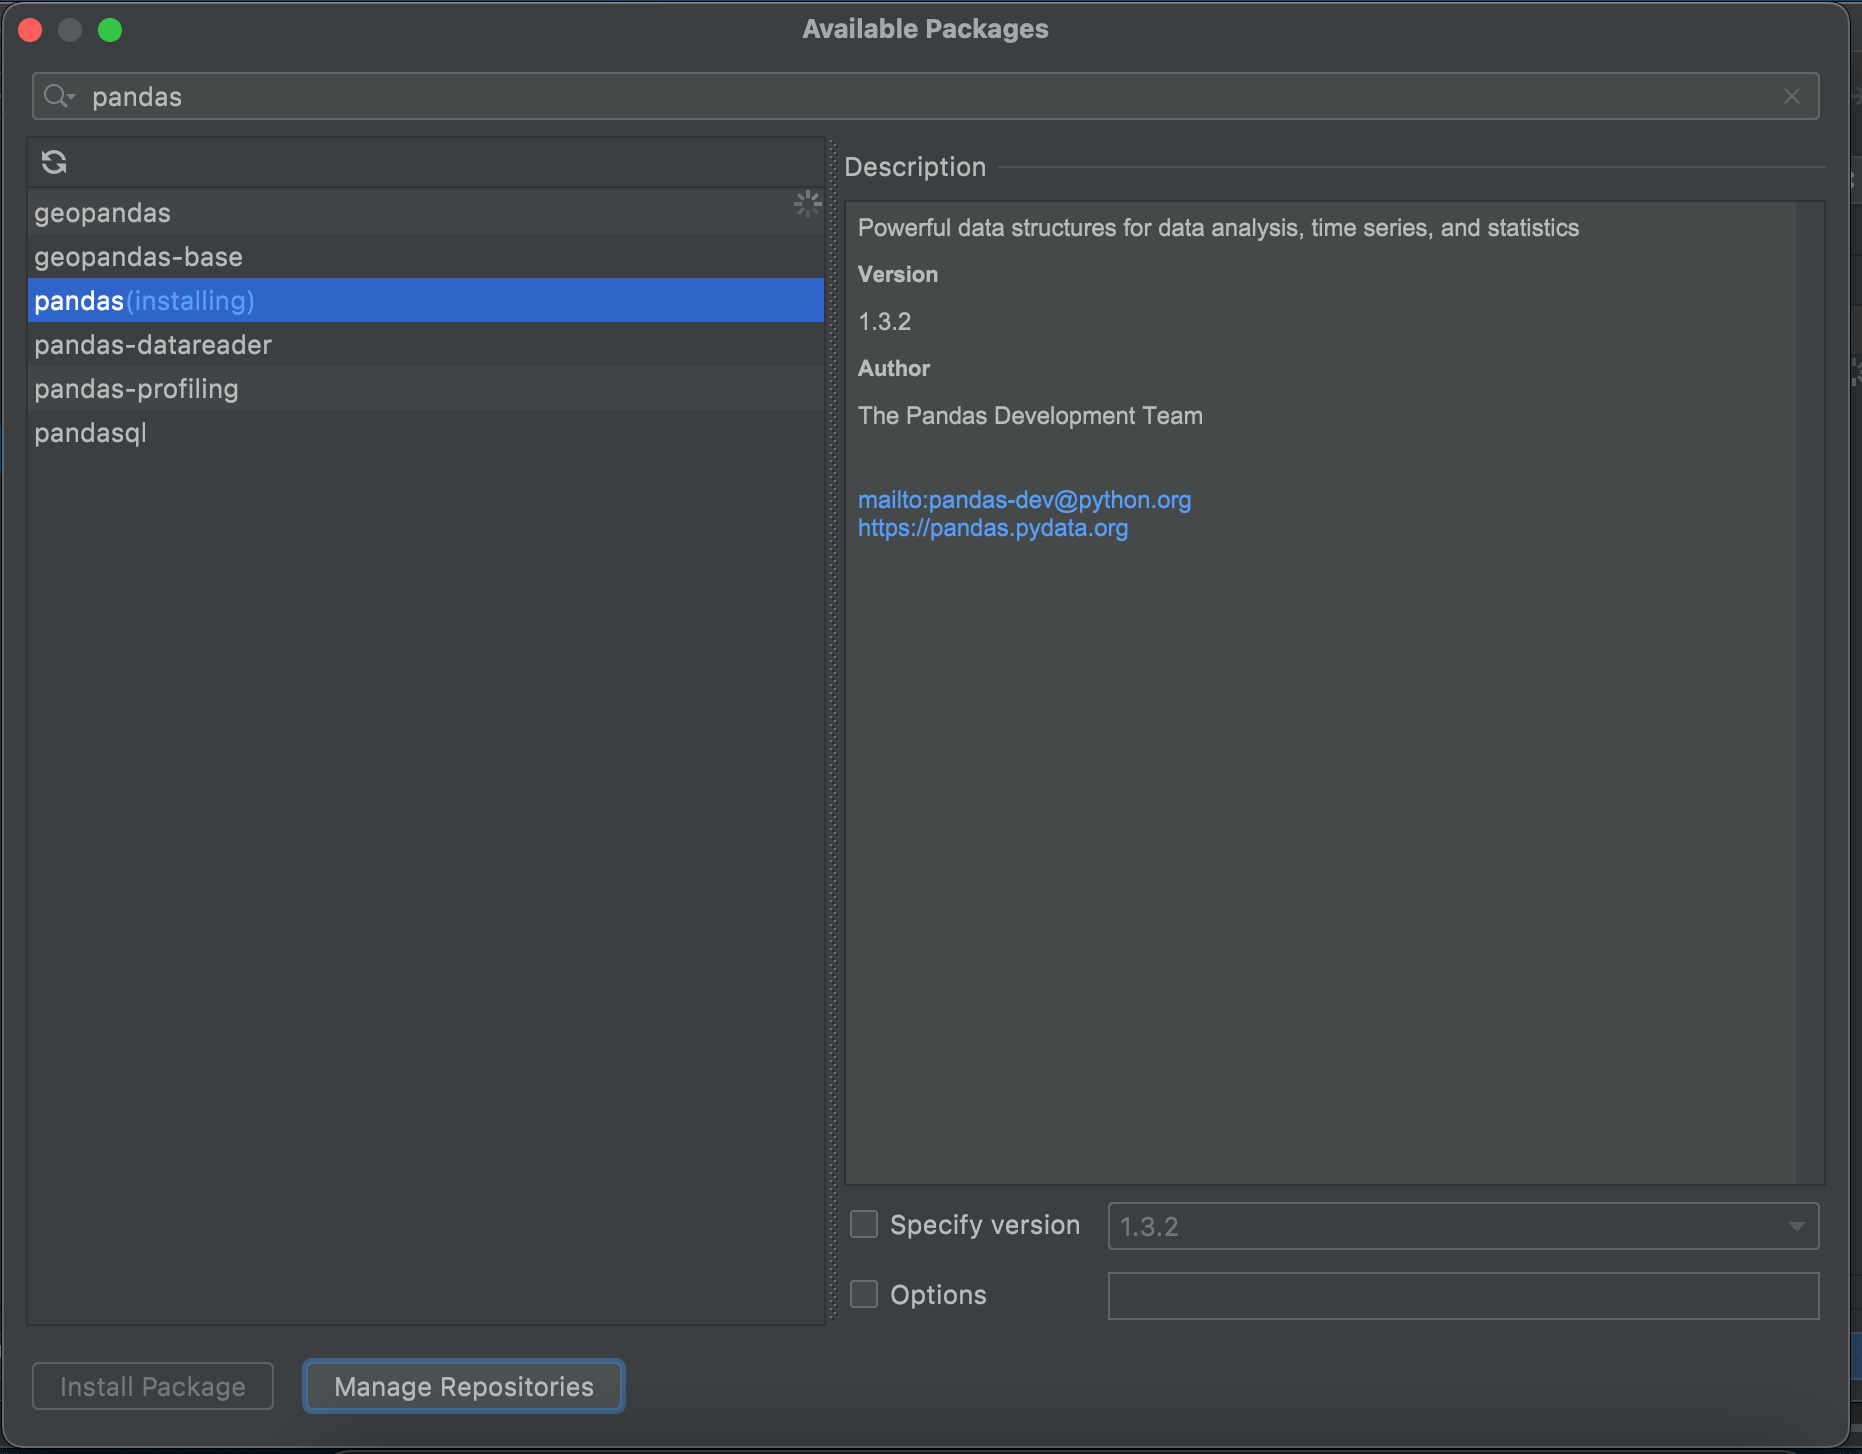
Go back to the previous window, you should now see the package and associated dependencies in the list of installed packages.
Best practice
One project one environment
It is recommended to create a separate environment for each project and save the environment under the project directory and name it as env.
Conda or pip? It is not a single choice question.
In conda environment, you can still use pip to install libraries. Please use conda for most of the package installation and pip for packages cannot be installed using conda.
Reference
 https://ealizadeh.com/blog/guide-to-python-env-pkg-dependency-using-conda-poetry